Here’s a look at the NVIDIA Jetson Nano Developer Kit hardware to help those looking to get started with the platform. In short, the Developer Kit is made up of the developer kit carrier board, and an NVIDIA Jetson Nano module. Together these two components make up the full NVIDIA Jetson Nano Developer Kit. Let’s look at the hardware of the boards.
In a previous article, I covered what the hardware specs (CPU, Memory, GPU, etc.) of the NIVIDA Jetson Nano; with a comparison to the Raspberry Pi 4. This article will take you through a look at the hardware of the physical boards; such as ports, GPIO, and the Jetson Nano module.

Developer Kit Carrier Board
The NVIDIA Jetson Nano Developer Kit when purchased includes two boards connected in the box. These boards are 1) the Carrier Board, and 2) the Jetson Nano Module.
Here’s a layout and description of all the ports and connectors on the NVIDIA Jetson Nano Developer Kit Carrier Board:

- micro-USB port – 5V @ 2A (10W total) power or data connection
- Gigabit Ethernet port
- 4x USB 3.0 ports – each stack of two USB 3.0 Type A connectors is limited to 1A total power delivery
- Video connectors (both HDMI and DisplayPort)
- 5V DC power input – 5V max @ 4 Amps (20W total) power
- MIPI CSI camera connector
- 8-pin Button header – pins for system power, reset, and force recovery related signals
- Serial port header
- SODIMM connector for the NVIDIA Jetson Nano Module
- M.2 Key E Slot – used for wireless networking cards, plus interfaces for PCIe (x1), USB 2.0, UART, I2S, and I2C
- Power over Ethernet (POE) – exposes any DC voltage present on the Ethernet jack per IEEE 802.3f
- Expansion header (Raspberry Pi GPIO compatible)
- 4-pin Fan control header – PWM (Pulse Width Modulation) output and tachometer input are supported
- Power LED – lights up when board is powered on
M.2 Key E Connector
The M.2 Key E Connector is accessible only once the Jetson Nano Module has been removed first, as the connector is underneath the module. This connector enables the addition of Wifi wireless networking cards, and includes interfaces for PCIe (x1), USB 2.0, UART, I2S, and I2C for the board.
It’s worth noting that you can also use USB wireless adapters with the board as well, so it’s not limited to just M.2 for wireless.
MIPI CSI Camera Connector
The MIPI CSI Camera connector on the carrier board supports the use of CSI cameras. This means the developer kit works with IMX219 camera modules; such as the Raspberry Pi Camera Module v2, or the Leopard Imaging LI-IMX219-MIPI-FF-NANO camera modules.
Carrier Board + Jetson Nano Module
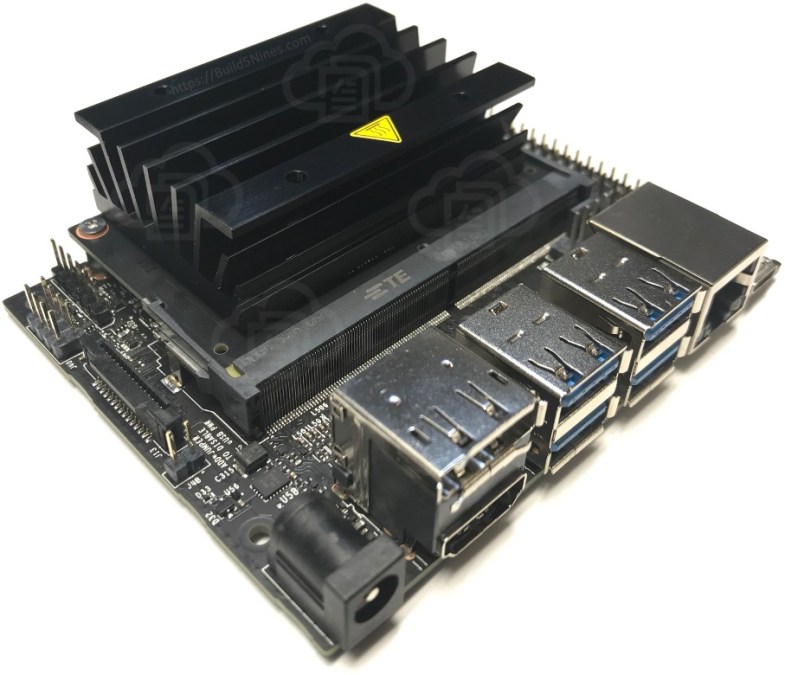
The NVIDIA Jetson Nano Developer Kit Carrier Board isn’t usable without the NVIDIA Jetson Nano Module plugged in. The developer kit carrier board is basically a motherboard of sorts with all the ports and connectors for development, where the Jetson Nano module provides all the CPU, GPU, memory, etc.
Here’s a side-view of the Developer Kit Carrier Board with the Jetson Nano Module connected, just as it come out of the box when purchased from NVIDIA.
NVIDIA Jetson Nano Compute Module
The NVIDIA Jetson Nano Module is really the compute board. The module contains the CPU, GPU, memory, and other components of the NVIDIA Jetson Nano platform.
Here’s a layout of the NVIDIA Jetson Nano Module from both top and bottom views with descriptions of some components worth pointing out:

- microSD card slot – supports minimum 16GB UHS-1 microSD card
- heatsink mount
- SODIMM connector – connects the module to the carrier board
- Heatsink – with mounting holes for connecting a cooling fan
If you’re interested in more details specs about the CPU, GPU and other capabilities of the module, then I recommend you go read my “Raspberry Pi 4 vs NVIDIA Jetson Nano Developer Kit” article.
Power Usage and Budgeting
The NVIDIA Jetson Nano Developer Kit supports both micro-USB and 5V DC power input. You can use either of these, but not both at the same time. You will need to decide which to use for your power needs.
Toggle between micro-USB or 5V DC power connectors
The carrier board can be powered by either the micro-USB or 5V DC power input connectors. Both ports cannot be used simultaneously. To control the toggle of which power method used, there is a jumper next to the camera connector on the carrier board.
This jumper is labeled J48 on the board, and when open will have the board powered by the micro-USB connector. With this configuration, the board is limited to 5V at 2A total power (or 10W).
When the J48 power jumper is bridged (or connected) then the board will use the 5V DC power connector. This will give the board the ability to draw more power. The 5V DC power connector has a limit of total power draw of 5V at 4A (or 20W).
Considerations for Power Budget Requirements
Your total power usage will consist of the power consumed by the carrier board, Jetson Nano module, and any peripherals connected via USB, M.2, expansion header, etc. Each use case will have unique power requirements, so you’ll need to be sure to use the correct micro-USB or 5V DC power connector accordingly. You’ll also need to make sure to not go over the max power capabilities of the board, and connect a power adapter appropriate for your needs.
The Jetson Nano Module is designed with two software-defined power modes to optimize power efficiency. The module can operate in modes with either a 5W or 10W power budget. The power management of the board will throttle the CPU and GPU frequencies, and control the number of simultaneously running CPU cores to stay near the power budget.
Some good news about the power budget modes is that the 10W power budget is the default mode for the Jetson Nano Module.
The power budget modes for the Jetson Nano Module govern the two power domains that are the GPU (VDD_GPU) and CPU (VDD_CPU). The individual parts of the CORE (VDD_SOC) power domain on the module are not covered by these budgets. For this reason, the power budgets will keep the module power usage “near” the 5W or 10W budget, but not “exactly” at the budget. Components such as video encode and video decode are not covered by the power budget management.
Additional Components Needed
The NVIDIA Jetson Nano Developer Kit comes with the carrier board and module only. To use the developer kit, you will need to purchase some additional components; such as power adapter, mouse, keyboard, and microSD card.
Here’s a list of the minimum required additional components with some suggestions on what to purchase:
- microSD card – at least a 16GB UHS-1 card
- micro-USB or 5V DC power adapter
- micro-USB power adapters
- USB wall plug with micro-USB cable
- Official Raspberry Pi Foundation 5V 2.5A micro-USB power supply
- Per+ 5V 3.5A AC micro-USB power adapter
- 5V DC power adapters
- micro-USB power adapters
- Display that supports HDMI or DisplayPort
- USB Keyboard and Mouse
Here are a couple wireless adapters listed in the supported component list from Nvidia that have been tested and validated to be compatible. Be sure to choose either a M.2 Key E or USB device as desired for your solution.
Also, don’t forget to purchase the NVIDIA Jetson Nano Developer Kit. 🙂
What’s your favorite feature of the NVIDIA Jetson Nano? Please leave a comment, I’d love to hear your thoughts!




 Azure Functions: Extend Execution Timeout Past 5 Minutes
 Azure Regions: Interactive Map of Global Datacenters
 Azure Resource Naming Conventions and Best Practices
 Terraform: Azure Resource Tags Tips
 Terraform: Deploy to Multiple Azure Subscriptions in Single Project
 How to Perform Simple String Concatenation in Terraform
